【C#】QueueとConcurrentQueueの使い方

C# で キューというデータ構造を扱う Queue<T> クラスと、スレッド排他制御機能付きの ConcurrentQueue<T> クラスの使い方の紹介をしたいと思います。

2つのQueue

まず「Queue」ですが一言で言うと、入れたデータが入れた順番に取り出せる入れ物の事を指します。以下のような1本のパイプのイメージです。

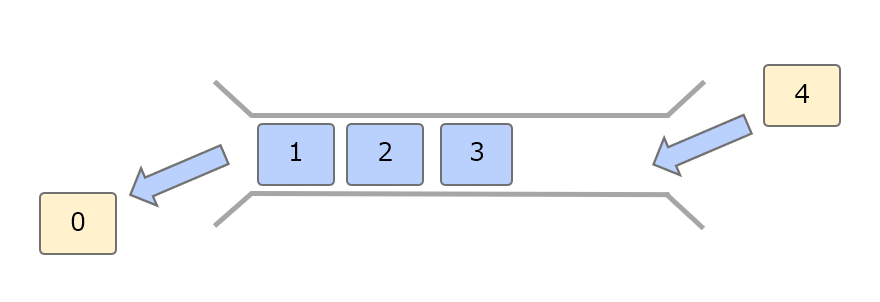
こういったデータ構造を先入れ先出し(First In First Out)を略して FIFO と呼んだりします。C# にはこの FIFO をサポートする Queue<T> というクラスがありその使い方の紹介になります。

また「ConcurrentQueue<T>」はこの Queue が複数のスレッドから同時にアクセスしても安全なスレッドセーフという特徴を持っています。まとめるとこんな感じです。

クラス 説明
Queue<T> 通常の Queue
ConcurrentQueue スレッドセーフな Queue

ちなみに操作方法は「ほぼ」同じです。

尚この記事では System.Linq で定義されている Linq の拡張メソッドについては範囲が広大になるため言及しません。

確認環境

この記事は以下環境で動作を確認しています。

  • VisualSturio2019
  • .NET 5
  • C# 9.0

Queue<T>の使い方

宣言

Queue<T> は完全名が「System.Collections.Generic.Queue<T>」のため最初に以下のように最初に using を宣言します。

// 最初に宣言する
using System.Collections.Generic;

// アセンブリ
// System.Collections.dll
// 
// クラスの宣言
// public class Queue<T> : IEnumerable<T>, IEnumerable, IReadOnlyCollection<T>, ICollection

基本的な操作

生成と値の出し入れは以下の通りです。List<T> と違って FIFO と用途が限定されているため利用できるメソッドが少なめです。

//
// (1)生成
// - - - - - - - - - - - - - - - - - - - -

// Queueのオブジェクトを新規作成
Queue<int> queue = new();

// 初期容量を指定してオブジェクトを新規作成
Queue<int> queue2 = new(256);

//
// (2)値の出し入れ
// - - - - - - - - - - - - - - - - - - - -

// ★★値を入れる

queue.Enqueue(0);
queue.Enqueue(10);
queue.Enqueue(100);
queue.Enqueue(1000);
queue.Enqueue(10000);
// この時点でのqueueの中身=[0, 10, 100, 1000, 10000]

// ★★値を取り出す

int a = queue.Dequeue();
// a=0, queueの中身=[10, 100, 1000, 10000]
int b = queue.Dequeue();
// b=10, queueの中身=[100, 1000, 10000]
int c = queue.Dequeue();
// c=100, queueの中身=[1000, 10000]
int d = queue.Dequeue();
// d=1000, queueの中身=[10000]
int e = queue.Dequeue();
// d=10000, queueの中身=[(カラ)]

int f = queue.Dequeue();
// 空のQueueから更に取り出そうとすると
// System.InvalidOperationException: 'Queue empty.' が発生する

// ★★値の安全な取り出し

// ★Queueが空でも例外を出さずに安全に値を取り出す
if (queue.TryDequeue(out int f2))
{
    // 値が取得できればここに入る
}
else if (queue.Count != 0)
{
    int f3 = queue.Dequeue();  // この処理方法でも同じ結果が得られる
}

//
// (3)その他の操作
// - - - - - - - - - - - - - - - - - - - -

// ★指定した要素が存在するか確認する
bool contains = queue.Contains(100);
// > contains=true
// true: 存在する / false: 存在しない

// ★保持しているすべての要素を消去する
queue.Clear();

// ★内部バッファーを縮小する
// 大量の要素を入れた場合最大要素数分+αのメモリ領域が確保されっぱなしになるのを開放できる
queue.TrimExcess();

特殊な操作

値の出し入れ以外に出来る操作は以下の通りです。

// 準備
Queue<int> queue = new();
queue.Enqueue(0);
queue.Enqueue(10);
queue.Enqueue(100);
queue.Enqueue(1000);
queue.Enqueue(10000);

//
// 特殊な操作
// - - - - - - - - - - - - - - - - - - - -

// ★★中身は減らさず先頭の値を取得する

// ★減らさずに取り出す
int a = queue.Peek();
// a=0, queueの中身=[10, 100, 1000, 10000]
int b = queue.Peek();
// b=0, queueの中身=[10, 100, 1000, 10000]
int c = queue.Peek();
// c=0, queueの中身=[10, 100, 1000, 10000]

// ★Queueが空でも例外を出さずに安全に値を取り出す
if (queue.TryPeek(out int f1))
{
    // 値が取得できればここに入る
}
else if (queue.Count != 0)
{
    int f3 = queue.Peek(); // この処理方法でも同じ結果が得られる
}

// (2)内容物を配列に変換する
int[] queueArray = queue.ToArray();
// queueArray=[10, 100, 1000, 10000]

// (3)Queue内の全要素を列挙する(取り出さない)
foreach (int item in queue)
{
    Console.WriteLine(item); // 10 > 100 > 1000...
}

ConcurrentQueue<T>の使い方

ConcurrentQueue ですが Queue と「ほぼ」同じです。ただ取り出すときの「Dequeue」と「Peek」が存在せず取り出すときは「TryDequeue」と「TryPeek」のみが存在します。これはこの Queue を使用するときは常に自分以外のスレッドから値が取り出されて、直前までは値があったのに自分が取り出すときに存在しないことがあるため「安全に中身を取り出す」ために Try~ 系で取り出すことになります。

宣言

ConcurrentQueue<T> は完全名が「System.Collections.Generic.ConcurrentQueue<T>」のため最初に以下のように最初に using を宣言します。

// 最初に宣言する
using System.Collections.Generic;

// アセンブリ
// System.Collections.dll
// 
// クラスの宣言
// public class ConcurrentQueue<T> :
//     IProducerConsumerCollection<T>, IEnumerable<T>,
//     IEnumerable, ICollection, IReadOnlyCollection<T>

なんか色々インターフェースを継承していますが、スレッドセーフですよーの目印の「IProducerConsumerCollection」を継承しています。まぁでもこれに大した意味はないです。

各種操作

Queue とほぼ同じなのでざっくり以下の通りになります。

ConcurrentQueue<int> queue = new();

queue.Enqueue(0); // 値を入れるときは同じ
queue.Enqueue(1);

// 値を取り出すときはTryXXXを使う
if (queue.TryDequeue(out int a))
{
    Console.WriteLine($"a={a}"); // 取り出せた時だけ処理する
}
if (queue.TryPeek(out int b))
{
    Console.WriteLine($"b={b}"); // 取り出せた時だけ処理する
}

スレッドセーフとは?

最後に Queue と ConcurrentQueue をマルチスレッドで使用したときの挙動の違いを確認します。まずは以下のコードとコメントを確認してください。

private static void Main(string[] args)
{

    QueueMultiThreadTest();
    ConcurrentQueueMultiThreadTest();
}

// (1) ConcurrentQueueをマルチスレッドで動かす
private static void QueueMultiThreadTest()
{
    Queue<int> queue = new();

    // 0~5までの6個の数字をマルチスレッドでQueueに入れる
    Parallel.For(0, 6, i =>
    {
        queue.Enqueue(i);
        // ★例外が出たり,
        // > System.ArgumentException: 'Destination array was not long enough.
        // Check the destination index, length, and the array's lower bounds.Arg_ParamName_Name'
    });

    foreach (var item in queue)
    {
        Console.WriteLine(item);
        // > 0
        // > 0
        // > 1
        // > 5
        // > 2
        // > 4
        // ★同じ値が複数入ったりする
        // ** 出力が順不同なのは仕様
    }

    Console.WriteLine();

    Queue<int> queue2 = new();
    queue2.Enqueue(0);
    queue2.Enqueue(1);
    queue2.Enqueue(2);
    queue2.Enqueue(3);
    queue2.Enqueue(4);
    queue2.Enqueue(5);

    Parallel.For(0, queue2.Count, i =>
    {
        int cnt = queue2.Dequeue();
        Console.WriteLine(cnt);
        // > 0
        // > 1
        // > 2
        // > 4
        // > 3
        // > 2
        // ★同じ値が複数取得されてることがある
        // ** 出力が順不同なのは仕様
    });
}

// (2) ConcurrentQueueをマルチスレッドで動かす
private static void ConcurrentQueueMultiThreadTest()
{
    ConcurrentQueue<int> queue = new();

    // 0~5までの6個の数字をマルチスレッドでConcurrentQueueに入れる
    Parallel.For(0, 6, i =>
    {
        queue.Enqueue(i); // エラーは出ない
    });

    foreach (var item in queue)
    {
        Console.WriteLine(item);
        // > 0
        // > 2
        // > 1
        // > 3
        // > 4
        // > 5
        // 順不同だが全て操作が完了する
        // ★★同じ値が複数回入ったりしない
    }

    Console.WriteLine();

    ConcurrentQueue<int> queue2 = new();
    queue2.Enqueue(0);
    queue2.Enqueue(1);
    queue2.Enqueue(2);
    queue2.Enqueue(3);
    queue2.Enqueue(4);
    queue2.Enqueue(5);

    Parallel.For(0, queue2.Count, i =>
    {
        if (queue2.TryDequeue(out int cnt)) // Try系で取り出す
        {
            Console.WriteLine(cnt);
        }
        // > 0
        // > 1
        // > 3
        // > 2
        // > 4
        // > 5
        // 順不同だが正常に処理が完了する
        // ★★同じ値が複数回取れたりはしない
    });
}

コード中のコメントに書きましたが Queue はマルチスレッドで使用すると内容が滅茶苦茶になります。途中で例外が出ることもあります。逆に ConcurrentQueue は内容に一貫性がある状態を保っています。複数のスレッドから同時に操作しようとしたときに安全かそうでないかが確認できました。

最後に

Queueでできない事

余談ですが Queue でできない事を以下に紹介します。

FIFO で最初に入れたものが最初に取れるという順序が保証できなくなる操作は提供されていません。

//
// Queueでできない事
// - - - - - - - - - - - - - - - - - - -

// ★★初期値を指定してオブジェクトの初期化はできない
Queue<int> queue = new Queue<int>()
{
    0, 10, 100
    // CS1061:
    // 'Queue<int>' に 'Add' の定義が含まれておらず、型 'Queue<int>'
    // の最初の引数を受け付けるアクセス可能な拡張メソッド 'Add' が見つかりませんでした。
};

// ★★インデックスアクセスはできない
int a = queue[1];
// CS0021:
// 角かっこ[] 付きインデックスを 'Queue<int>' 型の式に適用することはできません

// ★★ソートはできない
queue.Sort();
// CS1061:
// 'Queue<int>' に 'Sort' の定義が含まれておらず、型 'Queue<int>'
// の最初の引数を受け付けるアクセス可能な拡張メソッド 'Sort' が見つかりませんでした。

List<T>との使い分け

Queue の機能ですが基本的に List<T> でも同じことができます。List の部分的な機能が Queue と言ってもいいかもしれません。

// 以下のようにすると Queue と同じことができる
List<int> list = new()
{
    0, 10, 100
};

// 末尾に追加
list.Add(1000); 

// 先頭から取り出し & 削除
int i = list[0];
list.RemoveAt(0);

さて、List でも同じようなことができるのに Queue を使用する意義ですが、「ここは FIFO で順序を保証します」という設計意図が保証できます。この制限を他人に強制できてクラス自体余計な操作ができなので List のような柔軟な操作を禁止できます。

この制限により間に値を挿入したり先頭に値を追加することができません。List クラスは柔軟で動的な操作が可能かつ Linq も組み合わせると多様な機能が提供されている反面、自由すぎて実装意図を読み取るのは結構難しいケースがあるため実装の意図の明確化として有用なのではないかと思います。

ただ、最初は Queue で操作を制限していても途中で割り込み挿入が入ったり、ソートが必要等で仕様が変わると結局 List になってしまう事も多いので純粋な Queue が最後まで維持される事があまりないのも印象的です。

以上です。

C#でビット操作を簡単に行うラッパークラスの紹介

例えばC#でハードウェアに近い I/O を扱う場合、1チャンネルが ushort の1ブロックの読み書きが要求されていて、各ポートはビットごとに割り当てられているなんてケースが割とありますがいちいち出力ポートの設定を読んでビット操作をしてまた書き込むなどの操作はまぁ一部のユースケース以外に許されないと思います。

というか出力側は自分で値を保持していて管理値を送信するのが基本だと思います。

そういった場面でいちいちビット演算しているのはなかなか効率が悪いので「あるビット幅の値を操作を簡単に行えるクラス」というのを考えてみました。

確認環境

確認環境は以下の通りです。

  • VisualSturio2019
  • .NET 5.0
  • Windows10, コンソールプロジェクト

実装コード

さっそく実装コードの紹介です。

使い方

まずは使い方からです。ビット操作を行うクラス「BitManager」があます。そこに初期値を設定したインスタンスを作成し、「SetBit」「GetBit」 で各ビットを操作し、「ToUInt」や「ToULong」などでプリミティブな型に戻すことができます。

static void Main(string[] args)
{
    // 二進数で 1010 1010 1010 1010
    ulong value = 0xAAAA;

    // Long型の管理オブジェクトを作成
    BitManager bm = BitManager.Parse(value);

    // 内容を文字列に変換
    Console.WriteLine(bm.ToString());
    // > 0000 0000 0000 0000 0000 0000 0000 0000 0000 0000 0000 0000 1010 1010 1010 1010

    // 3ビット目を1に変更
    bm.SetBit(2, true);
    // 2ビット目を0に変更
    bm.SetBitInt(1, 0);

    // 内容を文字列に変換
    Console.WriteLine(bm.ToString());
    // > 0000 0000 0000 0000 0000 0000 0000 0000 0000 0000 0000 0000 1010 1010 1010 1100

    var v = bm.ToULong();
    Console.WriteLine("0x" + v.ToString("X16"));
    // > 0x000000000000AAAC
}

BitManager

「BitManager」の実装コードです。ユースケースによって作成した BitManager の値をプリミティブ型などで作成済みのオブジェクトの値を上書きしたいケースがあると思いますが、今回作成したクラスではサポートしていません。

/// <summary>
/// 任意のビット数を管理するためのクラスです。
/// </summary>
public class BitManager
{
    //
    // Fields
    // - - - - - - - - - - - - - - - - - - - -

    // true: 1 / false: 0 として bool で管理する
    private readonly bool[] bits;

    //
    // props
    // - - - - - - - - - - - - - - - - - - - -

    /// <summary>
    /// 現在管理中のビット数を取得します。
    /// </summary>
    public int BitLength => this.bits.Length;

    /// <summary>
    /// 管理ビット数を指定してオブジェクトを作成します。
    /// </summary>
    public BitManager(int bitCount) => this.bits = new bool[bitCount];

    /// <summary>
    /// 既定のサイズを指定してオブジェクトを作成します。
    /// </summary>
    public BitManager(BitSize size) : this(size.Value) { }

    //
    // Public Methods
    // - - - - - - - - - - - - - - - - - - - -

    // 指定したビットを設定または取得する
    public bool this[int index] { get => this.GetBit(index); set => this.SetBit(index, value); }

    public void SetBit(int bit, bool value) => this.bits[bit] = value; // チェックしない
    public void SetBitInt(int bit, int value) => this.bits[bit] = value != 0;
    public bool GetBit(int bit) => this.bits[bit];
    public int GetBitInt(int bit) => this.bits[bit] ? 1 : 0;

    // 任意のプリミティブ型から BitManager を作成する
    public static BitManager Parse(ulong value) 
        => ParseCommon(new BitManager(BitSize.Long), value);
    public static BitManager Parse(uint value)
        => ParseCommon(new BitManager(BitSize.Int), value);
    public static BitManager Parse(ushort value)
        => ParseCommon(new BitManager(BitSize.Short), value);
    public static BitManager Parse(byte value)
        => ParseCommon(new BitManager(BitSize.Byte), value);

    // 現在の管理値を指定したプリミティブ型へ変換する
    public ulong ToULong() => ToValue(BitSize.Long);
    public uint ToUInt() => (uint)ToValue(BitSize.Int);
    public ushort ToUShort() => (ushort)ToValue(BitSize.Short);
    public byte ToByte() => (byte)ToValue(BitSize.Byte);

    // 全てのビットを列挙する
    public int[] GetAllBitsInt()
    {
        var ret = new int[this.bits.Length];
        for (int i = 0; i < ret.Length; i++)
        {
            ret[i] = this.bits[i] ? 1 : 0;
        }
        return ret;
    }
    public bool[] GetAllBitsBool()
    {
        var ret = new bool[this.bits.Length];
        Array.Copy(this.bits, ret, ret.Length);
        return ret;
    }

    // 2進数で4ビット区切りで出力
    public override string ToString()
    {
        List<bool> list = new (this.bits); 
        list.Reverse();
        int i = 0;
        StringBuilder sb = new StringBuilder();
        list.ForEach(n =>
        {
            if (i++ == 4)
            {
                i = 1;
                sb.Append(' ');
            }
            sb.Append(n ? 1 : 0);
        });
        return sb.ToString();
    }

    //
    // Private Methods
    // - - - - - - - - - - - - - - - - - - - -

    private static BitManager ParseCommon(BitManager bm, ulong value)
    {
        for (int i = 0; i < bm.BitLength; i++)
        {
            ulong mask = 1UL << i;
            if (mask > value)
            {
                break;
            }

            bool bit = (value & mask) != 0;
            bm[i] = bit;
        }
        return bm;
    }

    private ulong ToValue(BitSize size)
    {
        ulong value = 0;
        for (int i = 0; i < size.Value; i++)
        {
            if (bits[i] == false)
            {
                continue;
            }

            value += 1UL << i;
        }
        return value;
    }
}

ビット操作は bool を int で受け付けています。一部効率の悪い処理が含まれるのは把握しています。処理効率を高めたい場合は必要に応じて各自コードを修正した方がいいかもしれません。

以上です。

中カッコのないif文の命令文を自動改行しない

VisualStudio 2017 および 2019 でオートフォーマットに関する以下の 2つの状況が発生した場合の設定方法です。

  • 中カッコのないif文を改行しない
  • using ステートメントの中カッコを改行しない

f:id:Takachan:20211024195113p:plain

なぜか1行で記述したい中カッコを省略したif文の命令文が新しい行に配置されてしまったり、using の中カッコが新しい行に配置されてしまったりする

if (true)
    Console.WriteLine("hoge"); // ★★オートフォーマット動作すると命令文が改行されてしまう

using(foo)
{ } // ★★オートフォーマットが動作すると中カッコが改行される

設定内容

オプションダイアログから

テキストエディター > C# > コードスタイル > 折り返し

から「1 行に複数のステートメントとメンバーを表示する」のチェックを ON にします。

f:id:Takachan:20211024194518p:plain

設定すると以下のようにオートフォーマットで改行されないように動作が変わります。

if (true) Console.WriteLine("hoge"); // ★★自動で改行されない

using (foo) { } // ★★自動で改行されない

簡単なことでしたが意外と影響している項目を探すのが大変でした…

以上です。

Unity向けタイマーライブラリ「UniTimer」をリリースしました

Unity向けのタイマーライブラリ「UniTimer」をリリースしました。

Git のリポジトリは以下の通りです。

github.com

Github の README と内容は同じですが、このライブラリの説明などは以下となります。

動作環境

  • Unity 2020.3 以降

このライブラリを使用する利点

このライブラリを使うとうれしい点は

タイマー処理のがコルーチンに比べて簡単に書ける

コルーチンをタイマー処理で使用した場合以下のように記述できます。

// コルーチンを使ったタイマー処理
private void Start()
{
    Coroutine c = StartCoroutine(nameof(this.printMessage));
}

// 1秒ごとにログを出力
private IEnumerator printMessage()
{
    for (int i = 0; i < 3; i++)
    {
        Debug.Log("Count=" + i);
        yield return new WaitForSeconds(1.0f);
    }
}

これをこのライブラリでは以下のように簡単に書くことができます。IEnumerator と yield という特徴的な

private void Update()
{
    // 簡単な処理ならラムダ式を使用してインラインで記述できる
    IUniTimerHandle h1 = this.StartTimer(1f, h => Debug.Log("Count=" + h.CurrentExecCount));
    
    // もちろんメソッドを指定して実行することもできる
    IUniTimerHandle h2 = this.StartTimer(1f, this.printMessage);
}

private void printMessage(IUniTimerHandle h) 
{
    Debug.Log("Count=" + h.CurrentExecCount);
}

途中で実行回数や呼ばれる処理を変更するのが容易

例えば1秒ごとに最初3回で開始したタイマーを途中で5回に変更し、タイマー呼び出しされる処理も変更する処理を簡単に記述できます。

private void Update()
{
    IUniTimerHandle h = 
        this.StartTimer(1.2f, this.foo).SetExecCount(3); // 1.2秒間隔で3回実行する
}

private void foo(IUniTimerHandle h) 
{
    Debug.Log("Count(1)=" + h.CurrentExecCount);
    if(/*何らかの条件*/)
    {
        // 1.2秒間隔で5回barを実行するように変更
        h.SetExecCount(5);
        h.ChangeElapsedHanlder(this.bar);
    }
}

private void bar(IUniTimerHandle h) => Debug.Log("Count(2)=" + h.CurrentExecCount);

導入方法

Package Manager に以下文字列を入力

https://github.com/Taka414/UniTimer.git

Git URL からのインストール

https://docs.unity3d.com/ja/2019.4/Manual/upm-ui-giturl.html

使用例

using System;
using UnityEngine;

namespace Takap.Utility.Timers.Demo
{
    public class SampleScript : MonoBehaviour
    {
        [SerializeField, Range(0.5f, 2f)] float timeScale = 1f;

        private void Start()
        {
            //
            // パッケージを取り込むと Monobehavior に以下の 4つのメソッドが追加される
            // 
            // (1) RegisterTimer: タイマーを待機状態で登録
            // (2) StartTimer: タイマーを開始した状態で登録
            // (3) DelayOnce: 指定した時間遅延して処理を1回実行する
            // (4) GetTimers: このコンポーネントから登録したタイマーを全て取得する
            // 

            MyLog.Log("Start timers.");

            Time.timeScale = this.timeScale;

            // ---------- Case.1 ----------
            // 1秒間隔で実行されるタイマーを登録した後に開始する
            IUniTimerHandle h1 = this.RegisterTimer(1f, _ => MyLog.Log("Case.1"));
            h1.Start();

            // ---------- Case.2 ----------
            // 1秒間隔で実行するタイマー登録して即座に開始する
            IUniTimerHandle h2 = this.StartTimer(1f, _ => MyLog.Log("Case.2"));

            // ---------- Case.3 ----------
            // LastUpdate で実行されるタイマー登録を行う
            // 通常は Update でタイマーが実行される
            IUniTimerHandle h3 = this.StartTimer(1f, _ => MyLog.Log("Case.3"), true);

            // ---------- Case.4 ----------
            // 1秒間隔で実行されるタイマーを登録して各種オプションを設定する
            IUniTimerHandle h4 =
                this.StartTimer(1f, _ => MyLog.Log("Case.4"))
                    // Time.timeScale を無視するタイマーに変更する
                    .SetIgnoreTimeScale(true)
                    // 5回だけ実行するように実行回数を指定する
                    .SetExecCount(5)
                    // 実行が終わったときにコールバックを呼び出す
                    .OnComplete(_ => MyLog.Log("Case.4 complete."));

            // ---------- Case.5 ----------
            // 1秒間隔で実行されるタイマーを登録して途中から実行間隔を変更する
            IUniTimerHandle h5 = this.StartTimer(1f, h =>
            {
                MyLog.Log("Case.5(1)");

                // 3回実行されたらインターバルを2秒間隔に変更して
                // 2回実行したら完了イベントを受け取るように変更する
                if (h.CurrentExecCount >= 3)
                {
                    h.ChangeInterval(2f)
                        .SetExecCount(2)
                        .ChangeElapsedHanlder(_ => MyLog.Log("Case.5(2)"))
                        .OnComplete(_ => MyLog.Log("Case.5(Complete)"));
                        // 全て実行が完了したら完了通知を行う
                }
            });

            // ---------- Case.6 ----------
            // 2秒後に指定した処理を1度だけ実行する
            IUniTimerHandle h6 =
                this.DelayOnce(2f, _ => MyLog.Log("Case.6(Once)"))
                    .OnComplete(_ => MyLog.Log("Case.6(Complete)"));

            // ---------- Case.7 ----------
            // タイムスケールを無視して2秒後に指定した処理を1度だけ実行する
            IUniTimerHandle h7 =
                this.DelayOnce(2f, _ => MyLog.Log("Case.7(Once)"))
                    .SetIgnoreTimeScale(true)
                    .OnComplete(_ => MyLog.Log("Case.7(Complete)"));

            IUniTimerHandle[] timers = this.GetTimers();
            Debug.Log("TimerCount=" + timers.Length);

            // ---------- Case.8 ----------
            // 終了時に何らかの条件次第でタイマーを延長する
            int i = 0;
            IUniTimerHandle h8 =
                this.StartTimer(1f, _ => MyLog.Log("Case.8"))
                    .SetExecCount(3)
                    .OnComplete(h =>
                    {
                        if (i++ < 2) // 2回延長したら終了
                        {
                            MyLog.Log("Case.8 add count");
                            h.AddExecCount(2); // 終了時にタイマーを2回追加
                        }
                    });

            // ---------- Case.9 ----------
            // タイマーハンドラ内で新しいタイマーを起動する(ver 1.1.2修正分)
            IUniTimerHandle h9 =
                this.DelayOnce(1f, _ => MyLog.Log("Case.9(1)"))
                    .OnComplete(h =>
                    {
                        this.DelayOnce(1f, _ => MyLog.Log("Case.9(2)"));
                    });

            // 
            // 補足:
            // 
            // (★1)
            // 登録したタイマーは Component や GameObject が破棄されたら同時に破棄されるので
            // OnDestroy に破棄するコードなどは書かなくてよい
            // 
            // (★2) 
            // また、コンポーネントの enabled や gameObject.activeInHierarchy
            // によって停止・再開は自動で行われるため
            // OnEnable に最下位処理は書かなくてよい
            // 
            // (★3)
            // 登録したときに得られる IUniTimerHandle 経由でタイマーの設定を後から変更できるため
            // 操作が発生する場合は戻り値のオブジェクトを状況に応じてフィールドに保存しておく
            // 
            // (★4)
            // 登録後に即座に実行するケースには対応しないので、自分で登録する前に1度呼び出してください
            // 

            //
            // 特記:
            // 
            // このタイマーライブラリで対応しない事:
            //   * FixedUpdate のサポートは対応しない
            //   * フレーム単位の実行のタイマーは対応しない
            //   * 途中から変更 Update ⇔ FixedUpdate の区分変更はできない
            //   * コルーチンの入れ子と同等機能のサポートはしない
            //     * 但し OnComplete で概ね代替している
            //
        }

        // Called by UnityEvent
        public void DeleteTimers()
        {
            foreach (IUniTimerHandle hnd in this.GetTimers())
            {
                using (hnd)
                {
                    // all delete
                }
            }
        }

        private IEnumerator printMessage()
        {
            for (int i = 0; i < 3; i++)
            {
                Debug.Log("Count=" + i);
                yield return new WaitForSeconds(1.0f);
            }
        }
    }

    public static class MyLog
    {
        public static void Log(string msg) => Debug.Log($"[{DateTime.Now:HH:mm:ss.fff}] {msg}");
    }
}

等間隔に並んだ画像データをグリッド毎にトリミングする

例えばスプライトアニメーションで等間隔に並んでいるデータの余白が大きすぎる場合、各画像の余白をトリムしたい場合がありますが、1枚の画像になっている場合トリミングするのはなかなか大変です。今回はそういった画像を

実行例

分かりやすいように極端に削っていますが、例えば以下のような4列4行な画像の各グリッドのの上下左右を20pxずつ削って

f:id:Takachan:20211009191502p:plain

以下のように変換して保存しなおします。

f:id:Takachan:20211009191726p:plain

実装・確認環境

この記事は以下の環境で作成及び動作確認を行っています。

  • ViauslStudio 2019(16.11.4)
  • .NET 5 + C# 9.0
  • Windows 10

以下の記事に従ってプロジェクトをセットアップ済み

takap-tech.com

コンソールだけど System.Drawing 使ってるせいで Windows のみという…w

実装コード

GridImageTrimParamクラス

処理を行うときに与えるパラメータークラスです。

/// <summary>
/// グリッド状の画像をトリムするためのパラメーターを表します。
/// </summary>
public class GridImageTrimParam
{
    #region 見本...
    //
    // 以下のような JSON ファイルを
    // JsonSerializer でデシリアライズできるように構成している
    // {
    //   "rows": 4,
    //   "columns": 4,
    //   "margin": {
    //     "left": 20,
    //     "top": 20,
    //     "right": 20,
    //     "bottom": 20
    //   },
    //   "padding_px": 1,
    //   "make_backup": true,
    //   "optimize_output": false
    // }
    //
    #endregion

    /// <summary>
    /// グリッドの列数を取得します。
    /// </summary>
    /// <remarks>よこ!</remarks>
    [JsonPropertyName("rows")]
    public int Rows { get; }

    /// <summary>
    /// グリッドの行数を取得します。
    /// </summary>
    /// <remarks>たて!</remarks>
    [JsonPropertyName("columns")]
    public int Columns { get; }

    /// <summary>
    /// 画像の余白を取得します。
    /// </summary>
    [JsonPropertyName("margin")]
    public ThicknessInt Margin { get; }

    /// <summary>
    /// グリッドとグリッドの間の上下左右に均等な余白を表します。既定値は 1px です。
    /// </summary>
    [JsonPropertyName("padding_px")]
    public int Padding { get; set; } = 1;

    /// <summary>
    /// 出力先に既に画像が存在した場合
    /// 既存のファイルをバックアップするかどうかのフラグを設定または取得します。
    /// <para>true: バックアップする(既定値) / false: バックアップしない</para>
    /// </summary>
    [JsonPropertyName("make_backup")]
    public bool MakeBackup { get; set; } = true;

    /// <summary>
    /// 出力結果を最適化するかどうかのフラグを設定または取得します。
    /// <para>true: 実行する / false: 実行しない</para>
    /// </summary>
    /// <remarks>
    /// lib の下に pngout.exe が配置されている事を想定。
    /// </remarks>
    [JsonPropertyName("optimize_output")]
    public bool OptimizeOutput { get; set; }

    /// <summary>
    /// 指定したパラメーターでオブジェクトを作成します。
    /// </summary>
    public GridImageTrimParam(int rows, int columns, ThicknessInt margin)
    {
        this.Rows = rows;
        this.Columns = columns;
        this.Margin = margin;
    }

    /// <summary>
    /// 外部の JSON ファイルを読み込んで <see cref="GridImageTrimParam"/> オブジェクトを取得します。
    /// </summary>
    public static GridImageTrimParam LoadJson(string filePath)
    {
        string jsonStr = File.ReadAllText(filePath);
        return JsonSerializer.Deserialize<GridImageTrimParam>(jsonStr);
    }
}

#### ThicknessIntクラス

GridImageTrimParam が使用する上下左右の余白の大きさを表すクラスです。

/// <summary>
/// 上下左右の4つの数値の組み合わせを表します。
/// </summary>
public class ThicknessInt
{
    [JsonPropertyName("left")]
    public int L { get; }
    
    [JsonPropertyName("top")]
    public int T { get; }
    
    [JsonPropertyName("right")]
    public int R { get; }
    
    [JsonPropertyName("bottom")]
    public int B { get; }

    /// <summary>
    /// 四隅のサイズを指定してオブジェクトを作成します。
    /// </summary>
    public ThicknessInt(int l, int t, int r, int b)
    {
        this.L = l;
        this.T = t;
        this.R = r;
        this.B = b;
    }
}

ごちゃごちゃ書いていますがコメントの通り以下のようなJSONファイルを読み取ってオブジェクトにすることができます。

{
  // タイルの数
  "rows": 4,
  "columns": 4,
  // トリミングするときの切り取り範囲
  "margin": {
    "left": 20,
    "top": 20,
    "right": 20,
    "bottom": 20
  },
  // 保存するときのグリッド間の余白(上下左右
  "padding_px": 1,
  "make_backup": true,
  "optimize_output": false
}

GridImageTrimServiceクラス

トリミングを行う主処理を担当するクラスです。上記のパラメータークラスを受け取ってグリッドをトリミングして保存します。

using System;
using System.Drawing;
using System.Drawing.Imaging;
using System.IO;

/// <summary>
/// グリッド状に配置されている画像の余白をトリムするためのクラス
/// </summary>
public class GridImageTrimService
{
    /// <summary>
    /// 1グリッドごとに余白をトリムして新しい画像として保存します。
    /// </summary>
    /// <param name="srcImagePath">加工する画像のファイルパス</param>
    /// <param name="param">加工パラメーター</param>
    /// <param name="destImagePath">加工した画像を出力するパス</param>
    public void Trim(string srcImagePath, GridImageTrimParam param, string destImagePath)
    {
        // 補足:
        // 何のパラメーターチェックもせずに処理開始なので注意

        Bitmap srcBmp = new(srcImagePath);

        // 元画像の1区画の大きさ
        Size2Di srcOneSize = new(srcBmp.Width / param.Rows, srcBmp.Height / param.Columns);

        // コピーする画像の大きさ
        Size2Di copyGridsize =
            new(srcOneSize.Width - param.Margin.L - param.Margin.R,
                srcOneSize.Height - param.Margin.T - param.Margin.B);

        // トリム後の1辺の大きさ
        Size2Di destOneSize =
            new(srcOneSize.Width - param.Margin.L - param.Margin.R + param.Padding * 2,
                srcOneSize.Height - param.Margin.T - param.Margin.B + param.Padding * 2);

        // 出力先画像オブジェクトの準備
        int destImgWidth = destOneSize.Width * param.Rows;
        int destImgHeight = destOneSize.Height * param.Columns;
        Bitmap destBmp = new(destImgWidth, destImgHeight, PixelFormat.Format32bppArgb);

        // 元画像を左上から右下に向かって処理していく
        for (int yi = 0; yi < param.Columns; yi++)
        {
            for (int xi = 0; xi < param.Rows; xi++)
            {
                // 元画像の切り取り開始位置
                Point2Di spos =
                    new(srcOneSize.Width * xi + param.Margin.L,
                        srcOneSize.Height * yi + param.Margin.T);

                // 宛先の貼り付け開始位置
                Point2Di dpos =
                    new(destOneSize.Width * xi + param.Padding,
                         destOneSize.Height * yi + param.Padding);

                this.trimOne(srcBmp, destBmp, copyGridsize, spos, dpos);
            }
        }

        using (srcBmp)
        {
            // nop
        }

        if (param.MakeBackup)
        {
            this.backup(destImagePath);
        }

        destBmp.Save(destImagePath, ImageFormat.Png);
        //
        // 補足:
        // このライブラリの保存は圧縮率が考慮されないため
        // こうやって保存しても微妙にサイズが大きいPNGが生成されてしまう
        // 
        //  → より小さいサイズを得たいなら他の高機能ペイントツールでPNGで開いて保存しなおす必要がありそう
        //     もしくは圧縮率を指定できる別のライブラリを使用するとか
        //
    }

    // 1グリッド分の画像をトリムする
    private void trimOne(Bitmap srcBmp, Bitmap destBmp, 
        Size2Di destOneSize, Point2Di spos, Point2Di dpos)
    {
        for (int yi = 0; yi < destOneSize.Height; yi++)
        {
            for (int xi = 0; xi < destOneSize.Width; xi++)
            {
                Color c = srcBmp.GetPixel(spos.X + xi, spos.Y + yi);
                destBmp.SetPixel(dpos.X + xi, dpos.Y + yi, c);
            }
        }
    }

    // ファイルのバックアップ処理
    private void backup(string destFilePath)
    {
        var baseTime = DateTime.Now;
        int i = 0;

        if (!File.Exists(destFilePath))
        {
            return; // バックアップの必要なし
        }

        while (true)
        {
            string suffix = 
                $"__bck__{baseTime:yyyyMMddHHmmssffff}{Path.GetExtension(destFilePath)}";
            string bckFileName =
                Path.GetFileNameWithoutExtension(destFilePath) +suffix;
            string bckFilePath =
                Path.Combine(Path.GetDirectoryName(destFilePath), bckFileName);

            // 他のバックアップを壊さないように可能なファイル名を探索する
            if (File.Exists(bckFilePath))
            {
                baseTime = baseTime.AddMilliseconds(-(--i)); // かぶらない時刻を探す
            }
            else
            {
                File.Move(destFilePath, bckFilePath);
                break;
            }
        }
    }
}

その他クラス

処理中に使用しているクラスは以下の通りです。

Size2Diクラス

横幅と縦幅の2つの値の組み合わせを保持するためのクラスです。

/// <summary>
/// 縦と横の大きさを表します。
/// </summary>
public struct Size2Di
{
    public int Width { get; }
    public int Height { get; }

    public Size2Di(int w, int h)
    {
        this.Width = w;
        this.Height = h;
    }
}
Point2Diクラス

ある位置 X と Y の2つの値の組み合わせを保持するためのクラスです。

/// <summary>
/// 2点 (X, Y) の組み合わせを表します。
/// </summary>
public struct Point2Di
{
    public int X { get; }
    public int Y { get; }

    public Point2Di(int x, int y)
    {
        this.X = x;
        this.Y = y;
    }
}

使い方

で、実際の使い方ですが、コンソールプログラムを以下のように記述して第一引数に設定ファイル、第二引数に変換したいファイル名を渡すようにしています。

internal class AppMain
{
    // args:
    // [0] setting.json のパス
    // [1] 変換対象の PNG のパス

    //[STAThread]
    private static void Main(string[] args)
    {
        AllocConsole();

        try
        {
            int i = 0;
            Console.WriteLine($"args:");
            foreach (string arg in args)
            {
                Console.WriteLine($"[{i++}] {arg}");
            }

            // 設定ファイルの読み込み
            var param = GridImageTrimParam.LoadJson(args[0]);

            // 変換処理実行
            GridImageTrimService service = new();
            service.Trim(args[1], param, args[1]);
        }
        catch (Exception ex)
        {
            Console.WriteLine(ex.ToString());
        }
    }

    [DllImport("kernel32.dll")]
    public static extern bool AllocConsole();
}

長々と書きましたが以上です。

【C#】appsettings.jsonをコンソールで扱う

コンソールアプリでも App.congi に代わる新しい定義ファイルの形式である appsettings.json を使用する場合の設定と実装方法の紹介です。

ASP.NET Core および ASP.NET 5~6 であれば、IServiceCollection.Configure にセクション名を渡せば勝手に内容をオブジェクトにマッピングしてくれる機能が存在しますが、コンソールアプリで始めてしまうとそこらへんが存在しないので自分で読み書きする形になります。

したがって、定義ファイルにアクセスしやすいようヘルパークラスの実装例を紹介したいと思います。

確認環境

この記事は以下環境で確認しています。

  • VisualStudio 2022
  • .NET 6
  • コンソールプロジェクトが作成済み

パッケージの導入

「NuGet パッケージの管理」の「参照」から探してもいいですが、微妙にわかりにくかったので「パッケージマネージャー コンソール」からインストールします。

ツール > NuGet パッケージ マネージャー > パッケージ マネージャー コンソール

NuGetのページ: https://www.nuget.org/packages/Microsoft.Extensions.Configuration.Json/

以下コマンドを入力します。

PM>
Install-Package Microsoft.Extensions.Configuration.Json -Version 5.0.0

プロジェクトに間接的に必要なDLLが以下の通り追加されます。

// 結構大量に追加されます
Microsoft.Extensions.Configuration.Abstractions.dll
Microsoft.Extensions.Configuration.dll
Microsoft.Extensions.Configuration.FileExtensions.dll
Microsoft.Extensions.Configuration.Json.dll
Microsoft.Extensions.FileProviders.Abstractions.dll
Microsoft.Extensions.FileProviders.Physical.dll
Microsoft.Extensions.FileSystemGlobbing.dll
Microsoft.Extensions.Primitives.dll

定義ファイルの追加・編集

ソリューションエクスプローラー > 対象プロジェクトのコンテキストメニュー > 追加 > 新しい項目

「JSON ファイル」などの JSON 形式のファイルを選択し「appsetting.json」という名前で追加します。(実際は名前は何でも良いです)追加したらファイルのプロパティでビルドアクションを「コンテンツ」に変更し、出力先ディレクトリにコピーを「新しい場合上書きする」に変更します。

JSON ファイルの内容は以下の通りに編集します。

{
    "MySettings": {
        "Key1": "Key1",
        "Key2": "Key2",
        "InnerSettings": {
            "Key3": "Key3",
            "Key4": "Key4"
        }
    }
}

値の取得

以下のように書けばアクセスできるようになります。

using System.IO;
using Microsoft.Extensions.Configuration;

internal class AppMain
{
    private static void Main(string[] args)
    {
        // 定義ファイルの読み書き用のオブジェクトを初期化する
        IConfigurationRoot configuration = 
            new ConfigurationBuilder()
                .SetBasePath(Directory.GetCurrentDirectory())
                    .AddJsonFile("appsettings.json", true, true).Build();

        IConfigurationSection section = config.GetSection("MySettings");
        string key1 = section["Key1"];
        string key2 = section["Key2"];
        
        // 取得できない場合null、例外は発生しない
        string strN = section["KeyXX"];

        // 入れ子の場合「A:B」という風にコロンを挟む
        IConfigurationSection innerSection = config.GetSection("MySettings:InnerSettings");
        string key3 = innerSection["Key3"];
        string key4 = innerSection["Key4"];
    }
}

アクセス用のヘルパークラスの作成

上記のようなコードを毎回書くのも面倒なのでヘルパークラスを作成して手間を軽減したいと思います。

AppSettingJsonクラス

以前の XML 形式の「アプリケーション 構成ファイル」と似たような形でアクセスできるといいので以下のような「MySettings」セクションの下に key-value 形式で値が並んでいる定義ファイルを想定してヘルパークラスを作成したいと思います。

// appsetting.json
{
    "MySettings": {
        "key1": "stringstring",
        "key2": 10,
        "key3": 123.5698
    }
}

実装は以下の通りです。

using System;
using System.Collections.Generic;
using System.Globalization;
using System.IO;
using System.Runtime.CompilerServices;
using Microsoft.Extensions.Configuration;

/// <summary>
/// appsettings.json のセクションを簡単に操作できるようにするためのヘルパークラス
/// </summary>
public class AppSettingsSection
{
    #region 見本...
    //
    // 見本:
    // 以下の通り記述されている appSettings.json 内のセクションへのアクセスを簡単にする
    //
    // appsetting.json
    // {
    //     "Setting": { ★ここ
    //         "key1": "stringstring",
    //         "key2": 10,
    //         "key3": 123.5698
    //     }
    // }
    //
    #endregion

    // 対象のセクション
    IConfigurationSection _section;

    //
    // Constructors
    // - - - - - - - - - - - - - - - - - - - -

    public AppSettingsSection(IConfigurationSection section)
    {
        _section = section ?? throw new ArgumentNullException(nameof(section));
    }

    //
    // Static Methods
    // - - - - - - - - - - - - - - - - - - - -

    public static AppSettingsSection CreateInstance(string filePath, string sectionName)
    {
        if (File.Exists(filePath))
            throw new FileNotFoundException($"File not found.", filePath);
        if (string.IsNullOrWhiteSpace(sectionName))
            throw new ArgumentException($"Require {sectionName}", nameof(sectionName));

        var config = new ConfigurationBuilder()
            .SetBasePath(Directory.GetCurrentDirectory())
                .AddJsonFile(filePath, true, true)
                    .Build();

        return new AppSettingsSection(GetSection(config, sectionName));
    }

    public static AppSettingsSection CreateInstance(IConfiguration config, string sectionName)
    {
        if (config == null)
            throw new ArgumentNullException(nameof(config));
        if (string.IsNullOrWhiteSpace(sectionName))
            throw new ArgumentException($"Requre {nameof(sectionName)}", nameof(sectionName));

        return new AppSettingsSection(GetSection(config, sectionName));
    }

    private static IConfigurationSection GetSection(IConfiguration config, string sectionName)
    {
        IConfigurationSection section =
            config.GetSection(sectionName) ??
            throw new KeyNotFoundException($"{sectionName} section is not found.");

        return section;
    }

    //
    // Public Methods
    // - - - - - - - - - - - - - - - - - - - -

    /// <summary>
    /// appSetting セクション内の指定したキーに対応する値を取得します。
    /// </summary>
    [MethodImpl(MethodImplOptions.AggressiveInlining)]
    public string GetString(string key) => GetValue(key);

    // 以下基本型として値を取得するメソッド
    public bool GetBool(string key) => Convert.ToBoolean(GetValue(key));
    public byte GetByte(string key) => Convert.ToByte(GetValue(key));
    public sbyte GetSByte(string key) => Convert.ToSByte(GetValue(key));
    public char GetChar(string key) => Convert.ToChar(GetValue(key));
    public decimal GetDecimal(string key) => Convert.ToDecimal(GetValue(key));
    public double GetDouble(string key) => Convert.ToDouble(GetValue(key));
    public float GetFloat(string key) => Convert.ToSingle(GetValue(key));
    public int GetInt(string key) => Convert.ToInt32(GetValue(key));
    public uint GetUInt(string key) => Convert.ToUInt32(GetValue(key));
    public long GetLong(string key) => Convert.ToInt64(GetValue(key));
    public ulong GetULong(string key) => Convert.ToUInt64(GetValue(key));
    public short GetShort(string key) => Convert.ToInt16(GetValue(key));
    public ushort GetUShort(string key) => Convert.ToUInt16(GetValue(key));
    // 時刻で取得
    public DateTime GetDateTime(string key, string format)
        => DateTime.ParseExact(GetString(key), format, CultureInfo.InvariantCulture);
    // 時間で取得
    public TimeSpan GetTimeSpan(string key, Func<double, TimeSpan> conv)
        => conv(GetDouble(key));

    //
    // Not-Public Methods
    // - - - - - - - - - - - - - - - - - - - -

    // 対象のセクションの値を取得する
    private string GetValue(string key)
    {
        return _section[key] ?? throw new KeyNotFoundException($"Key not found. key={key}");
    }
}

関連記事

takap-tech.com

takap-tech.com

.NET5のWPFにReactivePropertyをセットアップする

以前より圧倒的に簡単にセットアップできるようになっていて逆に混乱してしまったのでまとめておきます。

確認環境

  • VS2019(16.11.4)
  • .NET 5(C#9.0)
  • WPF プロジェクト作成済み(.NET, .NET F/W, .NET CoreどれでもOK)

セットアップ方法

Visual Studio のプロジェクトを右クリック > NuGet パッケージの管理から 「ReactiveProperty.WPF」 を導入する

もしくはパッケージマネージャーコンソールを開いて

ツール > NuGet パッケージ マネージャー > パッケージ マネージャー コンソール

以下コマンドを入力

NuGetのページ: https://www.nuget.org/packages/ReactiveProperty.WPF/

PM> Install-Package ReactiveProperty.WPF -Version 7.12.0

間接的に参照しているパッケージは自動的に解決してくれるので他は設定する必要ありません。

  • Microsoft.Xaml.Behaviors.dll
  • ReactiveProperty.dll
  • ReactiveProperty.Core.dll

UIイベントをCommandにバインドする

昔からUIのイベントをCommandににバインドする方法はありますが、数年前から書き方が変わってるので新しい方法を合わせて紹介します。

ViewModel側の定義

ViewModel 側には ReactiveCommand を以下のように宣言します。

ジェネリックで指定する型はイベント毎に型が違うのでイベントの引数とジェネリックの型が違うと実行時にキャストでエラーが出ます。MSDNのリファレンス見てイベントに応じた型を指定するようにしてください。

using Reactive.Bindings;

// ViewModelのコマンドの宣言
public class FolderViewModel : Bindable, IDisposable
{
    public ReactiveCommand<MouseEventArgs> ImageClickCommand { get; } = new();
}

// コマンドの処理内容を登録(コンストラクタとかから呼び出す)
private void SetupCommand()
{
    ImageClickCommand.Subscribe(e =>
    {
        // コマンドの処理内容
    });
}

XAML側の定義

XAML側はイベントトリガーをいつも通りに指定します。「xmlns:bh="http://schemas.microsoft.com/xaml/behaviors"」が「Microsoft.Xaml.Behaviors.dll」に対応した宣言です。

<UserControl x:Class="Samples.Sample"
         xmlns="http://schemas.microsoft.com/winfx/2006/xaml/presentation"
         xmlns:x="http://schemas.microsoft.com/winfx/2006/xaml"
         xmlns:mc="http://schemas.openxmlformats.org/markup-compatibility/2006" 
         xmlns:d="http://schemas.microsoft.com/expression/blend/2008" 
         xmlns:bh="http://schemas.microsoft.com/xaml/behaviors"
         xmlns:rp="clr-namespace:Reactive.Bindings.Interactivity;assembly=ReactiveProperty.WPF"
         xmlns:local="clr-namespace:Samples"
         mc:Ignorable="d"
         d:DataContext="{d:DesignInstance {x:Type local:FolderViewModel}}">

    <UserControl.DataContext>
        <local:FolderViewModel/>
    </UserControl.DataContext>

    <Grid>
        <Image Source="assets/icon.png">
            <!-- 以下を追加 -->
            <bh:Interaction.Triggers>
                <bh:EventTrigger EventName="MouseUp">
                    <rp:EventToReactiveCommand Command="{Binding ImageClickCommand}"/>
                </bh:EventTrigger>
            </bh:Interaction.Triggers>
        </Image>
    </Grid>
</UserControl>

以下を xmlns に追記

xmlns:bh="http://schemas.microsoft.com/xaml/behaviors"
xmlns:rp="clr-namespace:Reactive.Bindings.Interactivity;assembly=ReactiveProperty.WPF"

バインドしたいイベントの名前は IDE のインテリセンスには出てこないのでリファレンスを見るなどして正しい文字列を設定しましょう。

<bh:Interaction.Triggers>
    <bh:EventTrigger EventName="MouseUp">
        <rp:EventToReactiveCommand Command="{Binding ImageClickCommand}"/>
    </bh:EventTrigger>
</bh:Interaction.Triggers>

以上です。

.NET Core/.NET5以降のコンソールアプリでWPFの機能を利用する

.NET でコンソールアプリを作成した場合は WPF 関係のライブラリが使用できません。

static void Main(string[] args) { Bi tmapSource s = null; // CS0103 現在のコンテキストに 'BitmapSource' という名前は存在しません }

IDE 上には以下のように提案が出るのですが指定しても効きません。

f:id:Takachan:20211009170643p:plain

今回は

確認環境

この記事は以下の環境で動作確認を行っています。

  • ViauslStudio 2019(16.10.4)
  • .NET Core 3.1 + C#8.0
  • .NET 5 + C# 9.0

設定方法

ライブラリを使用したいプロジェクトのプロジェクトファイルを直接書き換える必要があるので、VisualStudio 上なら以下のように メニューを選択してプロ絵ジェクトファイルを開活きます。

プロジェクトのコンテキストメニュー > プロジェクト ファイルの編集

f:id:Takachan:20211009171018p:plain

初期値はだいたい以下のようになっていると思います。

// .csproj ファイル

<Project Sdk="Microsoft.NET.Sdk">

  <PropertyGroup>
    <OutputType>Exe</OutputType>
    <TargetFramework>net5.0</TargetFramework>
  </PropertyGroup>

</Project>

これを以下のように書き換えます。

// .csproj ファイル

// .NET Core3.1 の場合
<Project Sdk="Microsoft.NET.Sdk.WindowsDesktop"> <!-- ★★★(1) -->

  <PropertyGroup>
    <OutputType>WinExe</OutputType> <!-- ★★★(2) -->
    <TargetFramework>net5.0</TargetFramework>
    <UseWPF>true</UseWPF> <!-- ★★★(3) -->
  </PropertyGroup>

</Project>

// .NET 5 以降の場合
<Project Sdk="Microsoft.NET.Sdk"> <!-- 変更しない -->

  <PropertyGroup>
    <OutputType>WinExe</OutputType> <!-- ★★★(1) -->
    <TargetFramework>net5.0-windows</TargetFramework> <!-- ★★★(2) -->
    <UseWPF>true</UseWPF> <!-- ★★★(3) -->
  </PropertyGroup>

</Project>

これでエラーが消えます。

f:id:Takachan:20211009171454p:plain

コンソールウインドウが開かなくなる対応

.NET 5 以降、この設定を行うとコンソールウインドウが開かなくなったようで、その対応として以下のコードを追加します。

public static class Kernel32
{
    [System.Runtime.InteropServices.DllImport("kernel32.dll")]
    public static extern bool AllocConsole();
}

static void Main(string[] args)
{
    Kernel32.AllocConsole(); // ★Mainの一番先頭に追記する

こうすると今まで通りコンソールウインドウが表示されます。

関連記事

takap-tech.com

ディレクトリの中から最新の更新時刻のファイルを取得する

タイトルの通りですが、あるディレクトリ(フォルダ)の中から最新の更新時刻、つまり一番最後に内容を更新したファイルを 1件だけ取得する実装例です。

最近似たような処理を何度も書いた気がするので記事にしてみました。

確認環境

この記事は以下の環境で動作確認を行っています。

  • ViauslStudio 2019(16.10.4)
  • .NET Core 5 + C# 9.0

実装コード

まずは実装コードの紹介です。

DirectoryUtil クラス

最新のものを取得するだけでも良かったのですが逆の動作をする処理も実装しています。各々の説明は以下の通りです。

メソッド名 説明
GetLatestFile ディレクトリの中から最新の更新時刻のファイルを1件取得する
GetOldestFile ディレクトリの中から一番古い更新時刻のファイルを1件取得する
using System;
using System.IO;

namespace Takap.Utility
{
    public static class DirectoryUtil
    {
        /// <summary>
        /// 指定したディレクトリの中から更新時刻が一番新しいファイルを取得します。
        /// </summary>
        /// <returns>
        /// 最新のファイルパス。
        /// ただしディレクトリにファイルが1つも無ければ空文字を返す。
        /// </returns>
        public static string GetLatestFile(string dir)
        {
            return core(dir, (path, file)
                => File.GetLastWriteTime(path) > File.GetLastWriteTime(file));
        }

        /// <summary>
        /// 指定したディレクトリの中から更新時刻が一番古いファイルを取得します。
        /// </summary>
        /// <returns>
        /// 最新のファイルパス。
        /// ただしディレクトリにファイルが1つも無ければ空文字を返す。
        /// </returns>
        public static string GetOldestFile(string dir)
        {
            return core(dir, (path, file) 
                => File.GetLastWriteTime(file) > File.GetLastWriteTime(path));
        }

        private static string core(string dir, Func<string, string, bool> compare)
        {
            if (!Directory.Exists(dir))
                throw new DirectoryNotFoundException($"Directory not found. path={dir}");

            string file = "";
            foreach (string path in Directory.GetFiles(dir))
            {
                if (string.IsNullOrEmpty(file))
                {
                    file = path;
                }
                else
                {
                    if (compare(path, file))
                    {
                        file = path;
                    }
                }
            }
            return file;
        }
    }
}

使い方

上記処理の使い方は以下の通りです。唯一ディレクトリが空の場合、戻り値の string が共通して空文字列になるためチェックしてからパスを参照します。

internal class AppMain
{
    public static void Main(string[] args)
    {
        string filePath = FileUtil.GetLatestFile(@"D:\Sample");
        
        // ディレクトリが空だとファイルパスが取れないのでチェックする
        if(!string.IsNullOrEmpty(filePath))
        {
            Console.WriteLine(filePath); // 一番新しいファイルのパス
        }
    }
}

以上です。

2つのファイルの内容が同じかチェックする

C#で内容を含めて2つのファイルの内容が同じかどうかをチェックする方法です。

処理の流れは、2つのファイルをファイルサイズで比較した後、内容を1バイトずつ比較しています。

FileStreamで1バイトづつ比較しているのでメモリ使用量が少なく比較的高速に動作します。逆に一度ファイルの中身を全部 string で読みだして比較するとかするとメモリは大量に使用するは動作は低速だで大きいファイルの内容を比較するにはこの方法が一番よさそうです。

確認環境

この記事は以下の環境で動作確認を行っています。

  • ViauslStudio 2019(16.10.4)
  • .NET Core 5 + C# 9.0

実装コード

さっそく実装コードの紹介です。

FileUtilクラス

FileUtil クラス内に static メソッドとして IsSameContents を定義しています。

using System;
using System.IO;

public static class FileUtil
{
    /// <summary>
    /// 指定した2つのファイルの内容が同じかを確認します。
    /// </summary>
    public static bool ContentsEqual(string path1, string path2)
    {
        if (path1 == path2)
        {
            return true;
        }

        FileStream fs1 = null;
        FileStream fs2 = null;
        try
        {
            fs1 = new FileStream(path1, FileMode.Open, FileAccess.Read, FileShare.ReadWrite);
            fs2 = new FileStream(path2, FileMode.Open, FileAccess.Read, FileShare.ReadWrite);

            if (fs1.Length != fs2.Length)
            {
                return false;
            }

            int file1byte;
            int file2byte;
            do
            {
                file1byte = fs1.ReadByte();
                file2byte = fs2.ReadByte();
            }
            while ((file1byte == file2byte) && (file1byte != -1));
            return (file1byte - file2byte) == 0;
        }
        finally
        {
            using (fs1)
            { }
            using (fs2)
            { }
        }
    }
}

使い方

上記の処理の使い方です。

特に難しい事はないです。メソッドに 2 つのファイルのファイルパスを引数に指定して結果を bool 値で確認します。

static void Main(string[] args)
{
    string file1 = "foo.txt";
    string file2 = "bat.txt";

    bool result = FileUtil.IsSameContents(file1, file2);
    // true: 同じ内容 / false: 異なる内容
}

参考

stackoverflow.com

【Unity】画像をスクリプトから動的にスライスする

画像を縦横に等間隔でN個に分割(スライス)した場合、左上から右下になるように番号を振って、X=3,Y=6のような位置を指定するのが分かりやすいかと思います。

するとテクスチャーは、原点が左下なので位置計算が必要になります。毎回そのような操作をプログラミングするのは面倒なので上記の切り出しようのメソッドを利用しつつ簡単に使えるようにユーティリティを作成したいと思います。

確認環境

今回の確認環境は以下の通りです。

  • Windows10
  • Unity 2020.14f1

Editor上のみで確認

実装コード

DynamicSliceTextureクラス

単純に画像を切り出すだけの場合以下のメソッドが使えます。

Sprite sp = Sprite.Create(Texture2D texture, Rect rect, Vector2 pivot...);

等間隔に縦横の個数を指定してスライスした場合左上から右下にインデックスのような番号をふってインデックスで画像を指定したりします。すると縦横の個数から切り出す位置の計算が必要になるためその操作を簡単にするためにこのメソッドを利用する形でユーティリティ化しようと思います。

以下のクラスには「Sprite Editor から切り出したときと同じような画像の取得がインデックス指定でできる処理」と、「任意の位置を切り出す処理」の2つを実装しています。また動的に画像をスライスするためのクラスです。テクスチャー自体は編集しないので ScriptableObject で実装しています。

// Odin導入していれば各所コメントインしてもいいかも
//using Sirenix.OdinInspector;
using System;
using UnityEngine;

/// <summary>
/// テクスチャーを動的にスライスするためのスクリプト
/// </summary>
[CreateAssetMenu(menuName = "ScriptableObjects/Texture/DynamicSliceTextureSource")]
public class DynamicSliceTexture : ScriptableObject
{
    //
    // 説明:
    // 画像をスライスするときにSpriteEditorで2000枚とかになると
    // 操作がめちゃくちゃ重くて作業に支障が出るので
    // 実行時に指定のサイズでスライスするようにする
    //

    //
    // Const
    // - - - - - - - - - - - - - - - - - - - -

    // Pivot Center用
    private static readonly Vector2 _center = new Vector2(0.5f, 0.5f);
    // 5桁のゼロ埋め
    private const string _numFormat = "D5";

    //
    // Inspectors
    // - - - - - - - - - - - - - - - - - - - -

    // 対象テクスチャーを縦横に等分割する

    [SerializeField/*, LabelText("対象テクスチャ")*/] Texture2D _sourceTexture;
    [SerializeField/*, MinValue(1), LabelText("横の分割数")*/] int _columns = 1;
    [SerializeField/*, MinValue(1), LabelText("縦の分割数")*/] int _rows = 1;
    [SerializeField] float _pixelsPerUnit = 100;
    // 1枚当たりの画像の大きさ
    [SerializeField/*, ReadOnly*/] int _width;
    [SerializeField/*, ReadOnly*/] int _height;
    [SerializeField/*, ReadOnly*/] int _imageCount = -1;

    //
    // Props
    // - - - - - - - - - - - - - - - - - - - -

    /// <summary>
    /// 要素数を取得します。
    /// </summary>
    public int CellCount => _imageCount;

    /// <summary>
    /// 横の分割数を取得します。
    /// </summary>
    public int Columns => _columns;

    /// <summary>
    /// 縦の分割数を取得します。
    /// </summary>
    public int Rows => _rows;

    /// <summary>
    /// 1ユニットのピクセル数を取得します。
    /// </summary>
    public float PixelsPerUnit => _pixelsPerUnit;

    //
    // Runtime impl
    // - - - - - - - - - - - - - - - - - - - -

    public void OnValidate()
    {
        // 1セルごとの画像サイズ
        _width = 0;
        _height = 0;
        if (_sourceTexture != null)
        {
            _width = _sourceTexture.width / _columns;
            _height = _sourceTexture.height / _rows;
        }

        _imageCount = _columns * _rows;
    }

    //
    // Public Methods
    // - - - - - - - - - - - - - - - - - - - -

    /// <summary>
    /// 指定したインデックスの画像取得します。
    /// </summary>
    /// <remarks>
    /// インデックスは左上から右下に振られる
    /// e.g.
    /// > 0 1 2 3
    /// > 4 5 6 7
    /// > 8 9...
    /// 
    /// 注意:
    /// 動的に生成したSpriteは使用が終了したらDestryを呼ばないとリークする
    /// Sprite sp;
    /// sp.sprite = Getsprite(0);
    /// // こうすると直接代入すると古いSpriteはシーンに残る(=リークしているように見える)
    /// 
    /// Sprite old = sp.sprite;
    /// Destry(old):
    /// sp.sprite = Getsprite(0); // 先に破棄してから入れ替えること
    /// </remarks>
    public Sprite GetSprite(int index, SpriteMeshType meshType = SpriteMeshType.FullRect)
    {
        // 左下が原点(0,0)なのでそのように計算する

        int _index = index;
        if (index > _imageCount)
        {
            _index = index % _imageCount;
        }

        (int x, int y) = GetIndexXY(_index);
        float xpos = x * _width;
        float ypos = (_rows - y - 1) * _height;
        var rect = new Rect(xpos, ypos, _width, _height);
        var sp = Sprite.Create(_sourceTexture, rect, _center, _pixelsPerUnit, 0, meshType);
        sp.name = _index.ToString(_numFormat);

        return sp;
    }

    /// <summary>
    /// 指定した位置の画像を取得します。
    /// </summary>
    public Sprite GetSprite(int x, int y, SpriteMeshType meshType = SpriteMeshType.FullRect)
    {
        if (x > _columns || x < 1 || y > _rows || y < 1)
        {
            string msg1 = $"Value out of range. ";
            string msg2 = $"Range(x:0-{_columns}, y:0-{_rows}), Value(x={x} y={y})";
            throw new ArgumentOutOfRangeException(msg1 + msg2);
        }
        
        return GetSprite(y + x * _columns, meshType);
    }

    /// <summary>
    /// 画像から任意の位置を任意の大きさに切り出して Sprite を取得します。
    /// </summary>
    public Sprite GetSprite(int x, int y, 
                            int width, int height, 
                            float pixelsPerUnit = 100, uint extrude = 0, 
                            SpriteMeshType meshType = SpriteMeshType.FullRect)
    {
        var rect = new Rect(x, y, width, height);
        return Sprite.Create(_sourceTexture, rect, _center, pixelsPerUnit, extrude, meshType);
    }

    /// <summary>
    /// 指定した番号の画像をこのオブジェクトが持っているかどうかを取得します。
    /// true : 存在する / false : 存在しない(=問い合わせても画像が取得できない)
    /// </summary>
    public bool HasImage(int index)
    {
        return index < _imageCount;
    }

    /// <summary>
    /// 指定した <see cref="SpriteRenderer"/> に指定した番号の画像を設定します。
    /// </summary>
    public void ChangeSprite(SpriteRenderer sr, int index = 0)
    {
        Sprite old = sr.sprite; // 古いほうを削除してから新しいのを設定する
        if (old)
        {
            Destroy(old);
        }

        Sprite sp = GetSprite(index);
        sr.sprite = sp;
    }

    /// <summary>
    /// 指定した <see cref="ISpriteSelector"/> 経由で指定した番号の画像を設定します。
    /// </summary>
    public void ChangeSprite(ISpriteSelector selector, int index = 0)
    {
        Sprite old = selector.Sprite;
        if (old)
        {
            Destroy(old);
        }

        Sprite sp = GetSprite(index);
        selector.Sprite = sp;
    }

    // 番号をXとYの成分に分解する
    private (int x, int y) GetIndexXY(int index)
    {
        int x = (index % _columns);
        int y = index / _rows;
        return (x, y);
    }
}

作った画像は特にキャッシュなどはしていないですが、もし最適化するとなったら一度生成したものはキャッシュするほうがよさそうです。

使い方

使い方ですが上記が ScriptableObject なのでまず以下のようにフィールドを設定してインスペクターからオブジェクトを設定しておきます。

public class DynamicSliceTextureTest : MonoBehaviour
{
    // 表示テクスチャー(スライス)
    [SerializeField] DynamicSliceTexture textureSource;

で画像の取得方法は以下のようにするとすべて取得できます。

// 左上から右下に切り出した画像を全部列挙する
int count = this.textureSource.ImageCount;
for (int i = 0; i < count; i++)
{
    Sprite _sp = this.textureSource.GetSprite(i);
    Destroy(_sp);
}

// 任意の位置を切り出す
Sprite _sp = this.textureSource.GetSprite(100, 100, 200, 200);
Destroy(_sp);

1点注意ですが、ここで取得した Sprite は使い終わったら自分で Destroy しない限り解放されないので Sprite.sprite へ設定する前に元の画像を開放しておかないとシーンに大量の Sprite が存在することになるので注意してください。

関連記事

ちなみに Sprite.Create が遅いのは以下記事の通り高速化できます。上記の実装にも導入済みです。

takap-tech.com

【Unity】Sprite.Createが遅い・重い場合の対処法

3500x3500 のテクスチャーを 100x100 に切り出して1125個の Sprite を作成したら Ryzen 5900 なのに 30秒程度かかったため Sprite.Create の生成速度がヤバいなと思ったので調べました。

プロファイラーで見たところ1枚生成するのに 19ms もかかっていたので、これをモバイル環境で実行したらしばらく帰ってこなくなりそうなので調査しました。

こういう事は RawImage の方が得意なのかもしれませんが後でいろいろやりたいので RawImage ではなく Image コンポーネントでどうしたらいいか考えています。

問題の状況

実行環境

  • windows10
  • Ryzen 5900X
  • Unity 2020.3.14f1

Editor 上で確認

発生状況

ちなみに何がやりたかったかというと以下のような 3500x3500 の画像を100x100 に動的に切り出して

f:id:Takachan:20210724143606p:plain

以下のように再生しようとしていました。

f:id:Takachan:20210724143905g:plain

割と有名な動作らしく Sprite.Create が遅い、重いという説明をたまに見かけます。

改善方法

対策前

なんと1つの Sprite 作成に 19.21ms もかかっています。スパイクがやばい。

f:id:Takachan:20210723184317p:plain

対策後

対策すると 0.02ms になりました。

f:id:Takachan:20210723184645p:plain

19.21ms → 0.02ms なので 約960倍高速化しました。

コード

対策方法ですが、以下のように Create メソッドのオーバーロードで FullRect を指定するだけです。

// sourceTexture = Texture2D
// center = Vector2(0.5f, 0.5f);

// 遅い
var sp = Sprite.Create(this.sourceTexture, rect, center);

// 早い
var sp = 
    Sprite.Create(this.sourceTexture, rect, center, 
        this.pixelsPerUnit, 0, SpriteMeshType.FullRect); // ここまで指定する

FullRect なので、生成が軽くなりますがオーバードローの範囲が大きくなるのでそれだけ注意が必要です。

関連リンク

この方法を使って動的に画像をスライスする方法は以下で紹介しています。

takap-tech.com

参考

フォーラムにど真ん中の回答がありました。

forum.unity.com