Excel で管理しているゲームデータを自作のプログラムを使って ScriptableObject にインポートする方法を紹介したいと思います。
これ系は既にライブラリとかアセットが色々と配布されていて、それらを使用したほうが時間の節約になると思いますが、今回はを全て自作してみたいと思います。
ツール類は全て C# で作成し、Excel VBA や Python は使用しません。
確認環境
- Windows11 + VisualStudio2022
- Unity 2022.3.5f1
- .NET 6(コンソールアプリ作成用
- ExcelDataReader 3.6.0
- ExcelDataReader.DataSet 3.6.0
- Newtonsoft.Json 13.0.3
エディター上で動作を確認しています。
Excelからデータを取り込む流れ
Excel データを Unity に取り込む手順は以下の通りです。
- エクセルでデータを作成する
- Unity上でデータ構造を定義する
- エクセルを ExcelDataReader で JSON ファイルに変換する
- Unity上からJSONファイルを読み込む
実装手順
エクセルでデータを作成する
まず Excel でデータを作成します。見た目はこんな感じで Excel を作成しておきます。
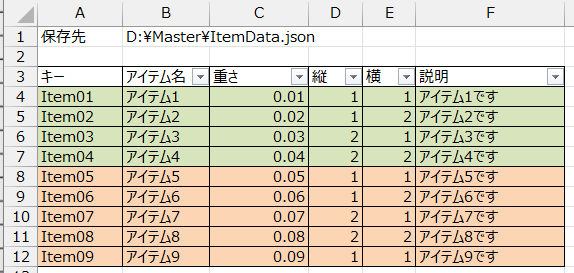
保存先 D:\Master\ItemData.json
| キー |
アイテム名 |
重さ |
縦 |
横 |
説明 |
| Item01 |
アイテム1 |
0.01 |
1 |
1 |
アイテム1です |
| Item02 |
アイテム2 |
0.02 |
1 |
2 |
アイテム2です |
| Item03 |
アイテム3 |
0.03 |
2 |
1 |
アイテム3です |
| Item04 |
アイテム4 |
0.04 |
2 |
2 |
アイテム4です |
| Item05 |
アイテム5 |
0.05 |
1 |
1 |
アイテム5です |
| Item06 |
アイテム6 |
0.06 |
1 |
2 |
アイテム6です |
| Item07 |
アイテム7 |
0.07 |
2 |
1 |
アイテム7です |
| Item08 |
アイテム8 |
0.08 |
2 |
2 |
アイテム8です |
| Item09 |
アイテム9 |
0.09 |
1 |
1 |
アイテム9です |
Unity上でデータ構造を定義する
Unity 上にエクセルデータに対応するデータ構造を ScriptableObject で実装します。
これをマスターデータとしてプロジェクトにアセットとして新規作成します。
using System.Collections.Generic;
using System.Collections.ObjectModel;
using UnityEngine;
namespace Takap
{
[CreateAssetMenu(menuName = "MyData/ItemMaster")]
public class ItemMaster : ScriptableObject
{
[SerializeField] List<ItemData> _itemList;
public ReadOnlyCollection<ItemData> ItemList
=> new ReadOnlyCollection<ItemData>(_itemList);
}
}
using System;
using UnityEngine;
namespace Takap
{
[Serializable]
public class ItemData
{
[SerializeField] string _key = "";
[SerializeField] string _name = "";
[SerializeField] float _weight;
[SerializeField] int _high;
[SerializeField] int _width;
[SerializeField] string _text;
public string Key => _key;
public string Name => _name;
public float Weight => _weight;
public int High => _high;
public int Width => _width;
public string Text => _text;
public ItemData(string key, string name, float weight, int high, int width, string text)
{
_key = key;
_name = name;
_weight = weight;
_high = high;
_width = width;
_text = text;
}
}
}
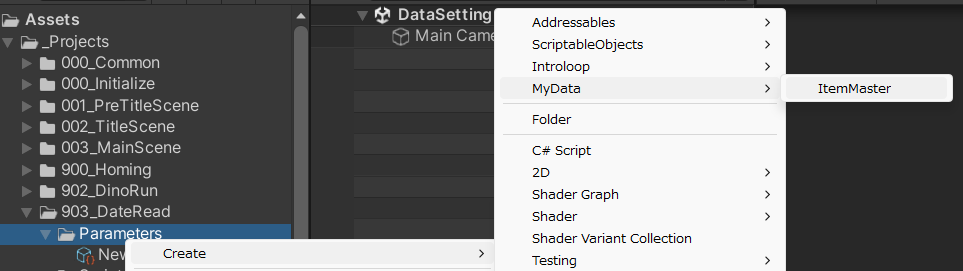
上記コードを追加するとプロジェクトのコンテキストメニューに以下のように MyData > ItemMaster という項目が追加されるのでそれを選択して、「ItemMaster」という名前でアセットを作成します。
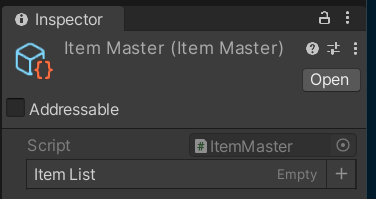
作成すると以下のような状態になっていると思います。

ExcelをExcelDataReaderでJSONファイルに変換する
Excel を JSON に変換するために外部にコンソールアプリを作成します。このプログラムに Excel をドラッグ & ドロップするとJSONが指定したパスに出力されるようにします。
VisualStudio 上からコンソールアプリのプロジェクトを新規作成し .NET 6 を選択してコンソールアプリを新規作成します。
NuGet から以下の 3つをインストールしておきます。
- ExcelDataReader
- ExcelDataReader.DataSet
- Newtonsoft.Json

そして、先ほど Unity 上に実装した ItemData.cs の内容をコンソールアプリ内にコピーし、コンソールアプリを以下のように実装します。
注意:1点制限があって ItemData クラスの読み書きしたい対象に JsonProperty 属性を追加しています。
using System;
using System.Collections.Generic;
using System.Data;
using System.IO;
using System.Linq;
using System.Text;
using ExcelDataReader;
using Newtonsoft.Json;
namespace MasterDataToJson
{
internal class Program
{
static readonly ExcelToJson _excelToJson = new();
static void Main(string[] args)
{
string excelFilePath = args[0];
_excelToJson.ExecExcelToJson(excelFilePath);
}
}
public class ExcelToJson
{
static readonly JsonSerializer _jsonSerializer = new();
public void ExecExcelToJson(string filePath)
{
using FileStream stream =
File.Open(filePath, FileMode.Open, FileAccess.Read, FileShare.ReadWrite);
using IExcelDataReader reader =
ExcelReaderFactory.CreateOpenXmlReader(stream, JpEncode());
DataTable sheet = reader.AsDataSet().Tables[0];
ItemData[] data = ReadContents(sheet).ToArray();
foreach (var item in data)
{
Console.WriteLine($"{item.Key}");
}
using TextWriter tw = new StreamWriter(GetOutputPath(sheet), false, Encoding.UTF8);
_jsonSerializer.Serialize(tw, data);
}
private static ExcelReaderConfiguration JpEncode()
{
Encoding.RegisterProvider(CodePagesEncodingProvider.Instance);
return new() { FallbackEncoding = Encoding.GetEncoding("Shift_JIS") };
}
private string GetOutputPath(DataTable sheet) => sheet.Rows[0][1].ToString();
private IEnumerable<ItemData> ReadContents(DataTable sheet)
{
for (int i = 3; i < sheet.Rows.Count; i++)
{
DataRow row = sheet.Rows[i];
yield return new ItemData(
row[0].ToString(),
row[1].ToString(),
float.Parse(row[2].ToString()),
int.Parse(row[3].ToString()),
int.Parse(row[4].ToString()),
row[5].ToString()
);
}
}
}
[Serializable]
public class ItemData
{
[SerializeField, JsonProperty] string _key = "";
[SerializeField, JsonProperty] string _name = "";
[SerializeField, JsonProperty] float _weight;
[SerializeField, JsonProperty] int _high;
[SerializeField, JsonProperty] int _width;
[SerializeField, JsonProperty] string _text;
public string Key => _key;
public string Name => _name;
public float Weight => _weight;
public int High => _high;
public int Width => _width;
public string Text => _text;
public ItemData(string key, string name, float weight, int high, int width, string text)
{
_key = key;
_name = name;
_weight = weight;
_high = high;
_width = width;
_text = text;
}
}
public class SerializeFieldAttribute : Attribute { }
}
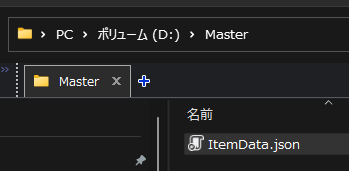
このプログラムをコンパイルして、Excel ファイルをこのプログラムにドラッグ & ドロップすると Excel 内で指定した位置にファイルが出力されます。
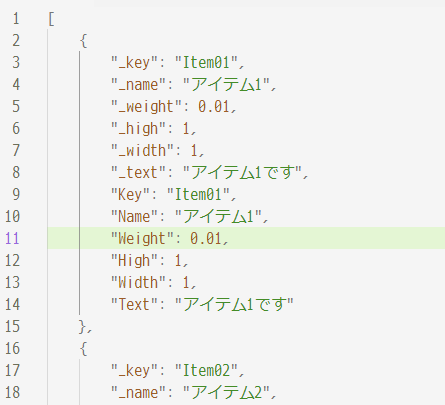
中身は整形するとこんな感じになってます(余計な要素も出力されていますが参照しないのでこのまま使用します)
Unity上からJSONファイルを読み込む
最後に JSON をUnity 上から読み取るための処理を実装します。
最初に作成した ScriptableObject をまず以下のように修正します。
using System.Collections.Generic;
using System.Collections.ObjectModel;
using Takap.Utility;
using UnityEngine;
namespace Takap
{
[CreateAssetMenu(menuName = "MyData/ItemMaster")]
public class ItemMaster : ScriptableObject
{
[SerializeField] List<ItemData> _itemList;
public ReadOnlyCollection<ItemData> ItemList
=> new ReadOnlyCollection<ItemData>(_itemList);
[SerializeField] string _filePath;
public void ReadJson()
{
if (string.IsNullOrEmpty(_filePath) || !System.IO.File.Exists(_filePath))
{
Debug.Log("JSONファイルが見つかりません。");
return;
}
string json = System.IO.File.ReadAllText(_filePath);
ReadJson(json);
}
public void ReadJson(string json)
{
ItemData[] items = JsonHelper.FromJson<ItemData>(json);
_itemList.Clear();
_itemList.AddRange(items);
#if UNITY_EDITOR
UnityEditor.EditorUtility.SetDirty(this);
UnityEditor.AssetDatabase.SaveAssets();
#endif
Debug.Log("インポートが完了しました。");
}
}
}
JsonHelper.FromJson はメソッドですがルート要素が配列のデータを扱うためのライブラリで以下のリンクから取得して記事中のコードをプロジェクトに取り込んでおいてください。
takap-tech.com
次に、ScriptableObject に Editor 拡張を追加して読み取りボタンを追加して読み取りを実行します。
#if UNITY_EDITOR
using UnityEditor;
using UnityEngine;
namespace Takap
{
[CustomEditor(typeof(ItemMaster))]
public class ItemMasterEditor : UnityEditor.Editor
{
public override void OnInspectorGUI()
{
DrawDefaultInspector();
ItemMaster targetClass = (ItemMaster)target;
if (GUILayout.Button("JSONの読み取り"))
{
targetClass.ReadJson();
}
}
}
}
#endif
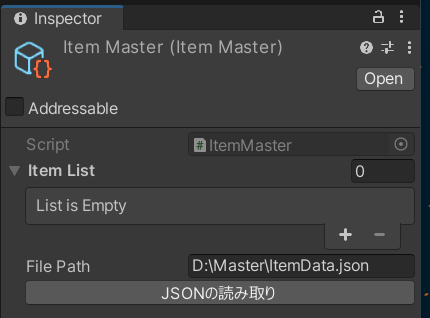
れこをビルドすると以下のようにJSONの読み取り実行ボタンと FilePath が表示されるので FilePath に Excel に入力したファイルパスを指定します。
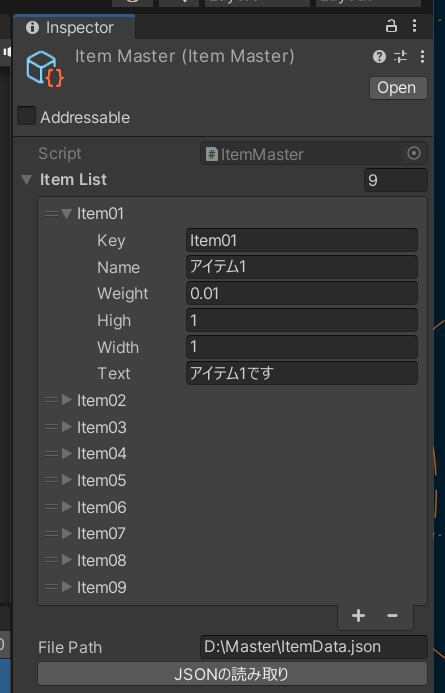
これで実行を押すとコンソールに「インポートが完了しました」というメッセージが表示されて、ItemMaster が以下の通り更新されていると思います。
これで Excel のデータを ScriptableObject に取り込むことができました。
この ItemMaster をインスペクターから GameObject に設定するなどしてゲーム中で使用することができます。
記事中の実装はサンプルなので機能がチープです。各自で使いやすいように機能は追加していきましょう。
最後に
この記事で紹介した内容は基本的な処理の流れのサンプルとなります。アイデア次第でもっと便利にすることもできると思います。
例えば、Excel も Unity 内に格納して処理を Unity 内で完結するようにしたり、Excel の更新を監視し、変更があったら JSON ファイルを生成してGit に Push まで自動でする事もできると思います。
JSON さえあればそのデータを ScriptableObject に取り込めるのでデータの管理は JSON にエクスポートさえできれば Excel 以外でも扱えます。Editor の実行前に変更があったらマスターを更新して実行なども考えられると思います。
全て自作は、配布されているツールの他人が考えた仕組みを覚える必要が無くて、ツールでは対応できないワークフローやデータ形式も柔軟に対応することができるのがよい所だと思います。
各自で機能を追加してどんどん便利にしていきましょう。